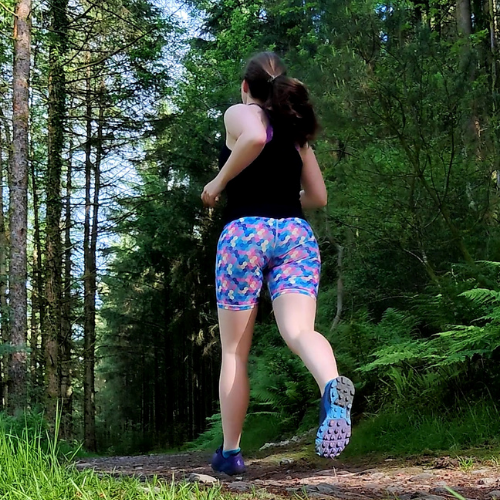
Blisters are one of the most common issues people suffer with in the mountains, whether it’s walking, running, biking, mountaineering or skiing. Despite their size, blisters can cause severe pain and discomfort and can lead to other complications like infection if not managed well. Although there may be slightly different approaches to blister management for different sports and especially for activities of varying duration, the overall principals are the same.
I hope this article will equip you with the knowledge to prevent blisters where possible and treat them appropriately using evidence based medicine (from the relatively small amount of research on this topic) as well as my own experience treating athletes on endurance events, clients on trekking expeditions and a few of my own blisters too.
What Causes Blisters?
The triad of friction, heat and moisture results in perfect conditions for friction blister formation. At this time of year when people are generally walking and running further and getting hot and sweaty, our feet our even more vulnerable to blisters.
Blisters are caused by repeated frictional force applied to the skin. This friction produces a shearing stress leading to a tear within the skin layers. Specifically, it is between the top three layers of the epidermis and the underlying stratum spinosum. Due to the tearing apart of the layers, a gap forms which then fills with fluid leaking from the nearby capillaries due to hydrostatic pressure.
Preventing Blisters
The strategy to prevent blisters should focus on reducing friction, heat and moisture. I split this up into two categories: foot care and kit.
- Foot Care:
- To reduce friction the skin on our feet needs to be soft and supple so it is easily malleable to move within the sock and shoe as our feet move. It is vital that feet are kept clean, dry, and moisturised, especially after a sweaty walk or run. Fungal conditions such as ‘athletes foot’ love hot sweaty feet too so good foot hygiene helps prevent infections as well as blisters.
- If you’ve got particularly sweaty feet or you’re on an extended journey it’s a good idea to take your shoes off when you stop for a break – let your feet and socks dry out as much as possible. Even a short time is helpful to reduce heat and moisture. The same thing applies at the end of a day – as soon as you can, take your sweaty shoes and socks off and clean and dry your feet. Good “foot admin” can make all the difference on multi day trekking or mountaineering expeditions and on endurance running events.
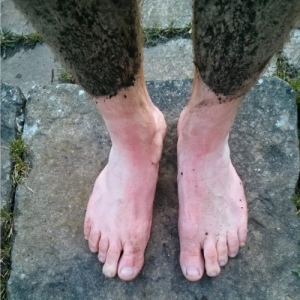
- Where possible during your adventure, avoid getting your feet wet by walking through puddles or streams if you can avoid them. Another common cause of wet feet is runners pouring water over their head at race checkpoints; it runs down their body and legs into their shoes.
- Regularly checking your feet thoroughly means you can spot other conditions early and treat them, such as skin infections and nail problems. Not only do these other conditions cause a problem in themselves, they can also lead to increased friction and moisture leading to blisters.
- Your kit:
- Well-fitted shoes that are appropriate to the activity and environment of your adventure are crucial. Hopefully it’s obvious but don’t use a brand new pair of shoes for a big event, at least break them in first with shorter outings. If you’ve got a well-worn pair of shoes, check them regularly to ensure the material inside has maintained its integrity and shape – any deformity could cause extra friction points.
- I’m no expert in endurance running but in general the consensus is to stay clear of waterproof running shoes as water gets in from the top then can’t drain out. Over a long run this leads to macerated feet (soggy, wrinkled and painful) as well as blisters.
- If you wear insoles, again make sure they are well fitted.
- Clean and dry shoes and insoles after use to ensure there is nothing on the internal surface that could case a problem the next time you wear them.
- Good socks can reduce moisture and friction loads on the surface of the foot to help prevent blisters. Generally, sock fibres that wick moisture from the foot surface are also the fibres that have the lowest friction coefficient. Studies have shown that acrylic fibres and polyester fibres are better at wicking moisture from the surface of the foot than other materials, especially cotton. These types of synthetic fibres also tend to retain their shape better by resisting bunching and wrinkling when wet in comparison to cotton socks.
- Carry an adequate blister management kit with you. In the next section I explain the system I use. Some people like to pre-tape any vulnerable areas on their feet that they’ve had previous trouble with. I sometimes do this on my heels if I’m wearing my rock climbing shoes for several days in a row. However I would advise caution with this as there is currently no evidence (except anecdotal) that pre-taping helps prevent blisters and tape often doesn’t withstand vigorous exercise for more than a few hours so if it does become rucked up in your shoe it can become a cause of friction and blisters.

Managing Blisters
- Stop and sort it! Managing a ‘hot spot’ is so much easier and less painful than managing a big, nasty blister but they all start small so catching it early is the key.
- Clean and dry the whole foot. If this isn’t completely possible, at least ensure the damaged skin is clean and dry. Use water and alcohol wipes.
- If you’re helping someone else with a blister, make sure you’re comfortable and you can clearly see and access the area of the foot you’re treating. This might mean the person is lying on their front if the blister is on their heel or sole.
- Ensure the foot is in the neutral position so that any dressing you apply is not restrictive or too loose when the foot is moved.
- Wash or clean your hands with alcohol gel or wipes so you don’t introduce infection to the damaged skin.
Draining a blister
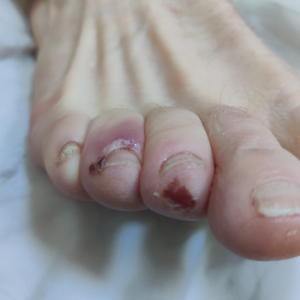
If it’s flat, it doesn’t need draining so just dress it. If the blister is raised, it will act like a stone in your shoe, increasing the friction and the blister size so these are the ones that need draining. In my experience draining the blister as soon as possible is great pain relief because the fluid build up causes pain. Puncture the blister with a small, sterile needle or a small scalpel blade in a few of locations near the edge of the blister. It is vital you make sure you keep the blister ‘roof’ in tact. Do not remove the roof as it is protecting the underlying skin layers from further friction, infection and pain. You may need to repeat the drainage in this in the first 24 hours if fluid accumulates.
Immediately after you’ve drained the fluid, dry the area then apply a dressing to ensure adherence of the blister roof to the underlying skin layers to prevent fluid accumulation.
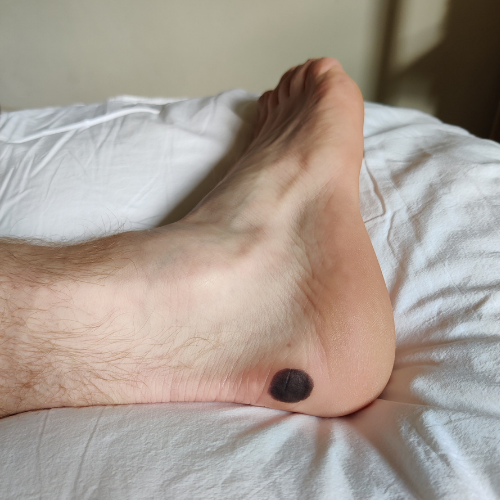
Caveat – some people prefer not to drain blisters because whenever you make a hole, you run the risk of introducing infection. If the blister is small and not painful, drainage may not be required, especially if you are going to struggle to keep the area clean and dry over the next few days whilst it heals. In general, I don’t drain blood blisters due to higher infection risk unless they are large and very painful.
Blister Dressings
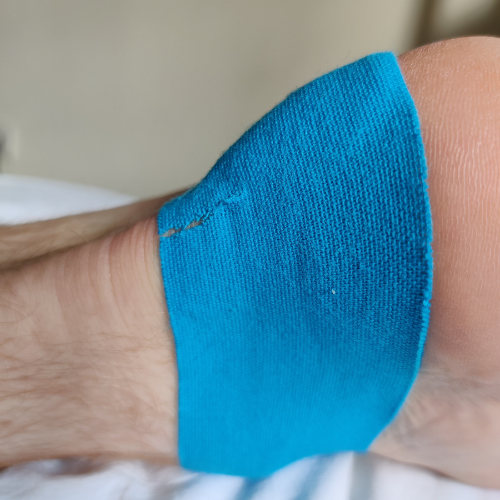
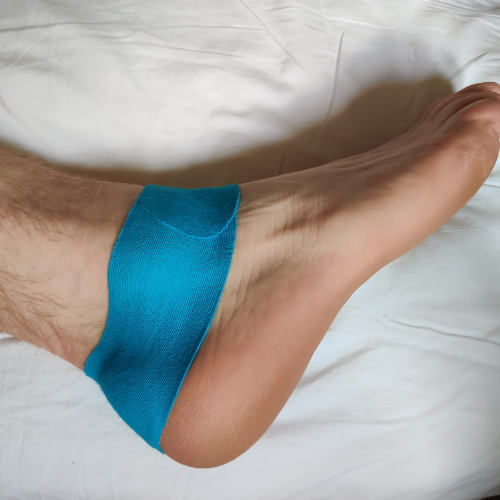
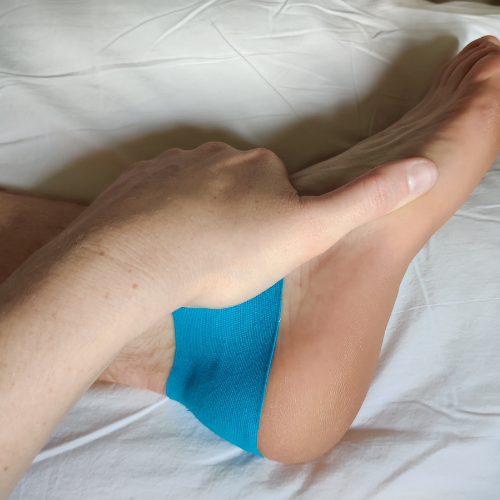
People use lots of different types of dressing but you don’t need anything high tech or expensive. I use a combination of a soft, padded layer called Fleecy Web then some Kinesiology Tape (K-tape) on top to protect it and hold it all in place under some pressure. This material combination is a favourite of many medical teams experienced in treating athletes on endurance walking and running events as well as trekking expeditions because it is relatively easy to apply, works really well to protect the blister and doesn’t come off easily like regular plasters or dressings!
Method:
- Warm the clean foot and the dressing material with your hand before applying to ensure the glue has the best chance of sticking
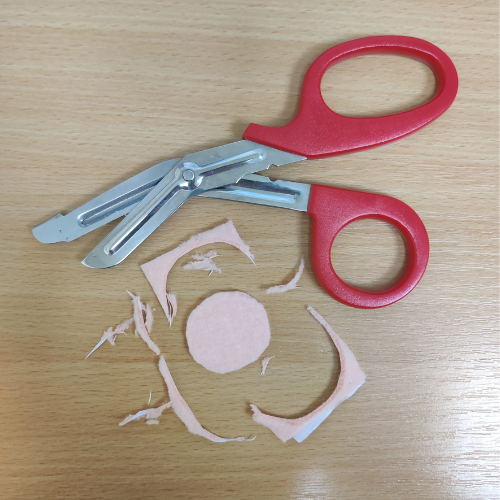
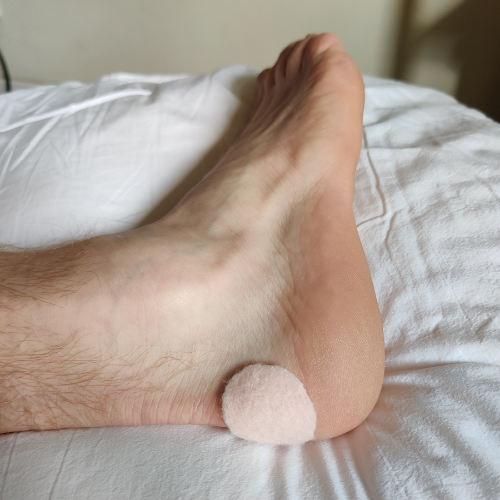
- Cut the fleecy web just larger than the blister size
- Cut the corners off so it’s a rounded shape (corners are prone to rolling up and becoming a friction point)
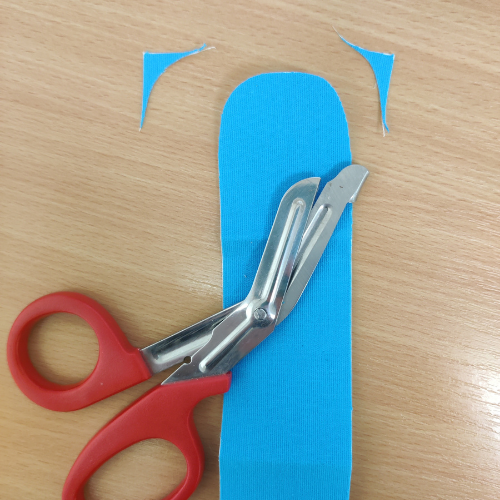
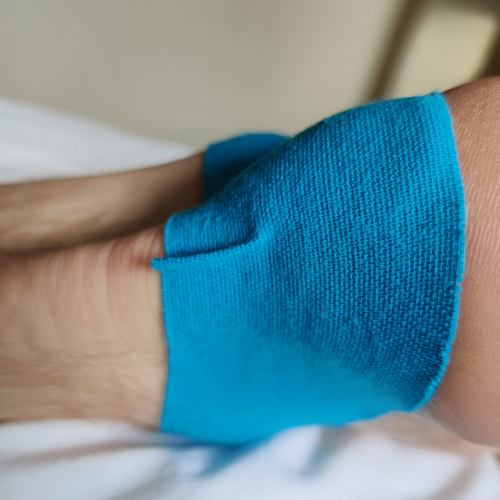
- Cut a piece of tape that’s a bit longer than you think you’ll need – tape sticks better to tape than to skin so aim to wrap the tape round the whole foot if necessary. Cut the corners off to make the edges round first.
- Try to ensure there are no creases in the tape, if it is an awkward place e.g. near the toes where this is difficult, carefully cut off any wrinkles in the tape or cut a section of tape out.
- Take care not to apply the tape too tightly as we don’t want to restrict movement and the feet will also swell during the day with heat.
- Firmly place your warm hands over the tape for at least a minute to ensure it warms up and sticks properly.
- If you’re treating a blister that is already de-roofed, use a non-adhesive (non-sticky) dressing e.g. an inadine dressing then K-tape over the top as before.
- Some areas of the feet are tricky to dress well – if you apply a dressing and it’s just not right then don’t be put off by starting again, it will save time and pain in the long run.
These pictures demonstrate the dressing method:
Controversial Compeed…Some people swear by compeed (Compeed is a brand name, other brands are available and the products are sold as a type of ‘second skin’). When prepared and applied properly it can work really well as a short-term blister dressing. However these types of hydrocolloid material should be used with caution and certainly not left on for long periods. These dressings over hydrate the skin and if left on for over eight hours the blister and surrounding skin become macerated (soggy and wrinkled) and the compeed usually sticks to the roof of the blister. This means when you come to remove the dressing it also removes the roof of the blister and sometimes some surrounding skin and tissue too, leaving an open, painful, vulnerable area of the lower layers of the skin which takes longer to heal, is more prone to infection and is very painful. I personally don’t use or recommend compeed or similar products.
5 Myth Busters
- Calluses aren’t helpful. As described above, soft, supple skin is best at reducing friction and therefore blisters. Callused skin doesn’t help and for anyone who’s had a blister on a callus, you’ll know they are often extra painful!
- Lubricating agents such as petroleum jelly or oils are often advised as a blister prevention measure but research has shown it can actually increase blister formation in activities over three hours in duration (1).
- Applying drying powders to the feet to prevent friction blisters has no supporting evidence. In fact there are studies showing that although talcum powder reduces frictional force on the surface of the foot, when the power is combined with moisture e.g. sweat, the frictional force and abrasiveness actually increase as the powder becomes a sticky mess (2-4) Saying that, lots of endurance runners use it to help keep their feet dry on particularly wet races when foot maceration is likely.
- As mentioned above, some people advocate the use of various types of tape to prevent blister formation. However there are no published studies to show they work and it often leads to problems if poorly applied or worn for long durations when they’re likely to ruck up.
- Applying antiperspirants to feet to reduce blister rates has mixed evidence and there are at least two well designed randomized controlled trials showing no difference in blister rates when people walked in warm temperatures having sprayed an antiperspirant on their feet (5, 6).
References:
- Nacht S, Close J, Yeung D, et al. Skin friction coefficient changes induced by skin hydration and emollient application and correlation with perceived skin feel. J Soc Cosmet Chem 1981;32:55-65.
- Allan JR. A study of foot blisters. United Kingdom: Army Operational Research Establishment Technical Report No. 1/64, 1964.
- Allan JR, Macmillan AL. The immediate effects of heat on unacclimatized paratroops. Exercise “Tiger Brew II.” United Kingdom: Army Personnel Research Establishment Technical Report No. 16/62, 1963.
- Quinn J. The effects of two new foot powders on the incidence of foot infection and blisters in recruits during basic training. Farnbourogh, United Kingdom: Army Personnel Research Establishment Technical Report No. P/6, 1967.
- Knapik JJ, Reynolds KL, Duplantis KL, et al. Friction blisters: pathophysiology, prevention and treatment. Sports Med 1995;20(3):136-47.
- Reynolds K, Darrigrand A, Roberts D, et al. Effects of an antiperspirant with emollients on foot-sweat accumulation and blister formation while walking in the heat. J Am Acad Dermatol 1995;33(4):626-30.